|
High Dynamic Range photography is a way of shooting images in order to capture the full range of luminance and tone available in a scene which is more than what a camera can capture with one exposure. The goal is to produce a print that approximates what the photographer saw. The human eye can see a much wider range of tones and luminance levels than a camera. High Dynamic Range photography works best with still objects but if you want people in your shot be sure that they are far enough from the camera to minimize motion blur. When would you use this technique? When the contrast between the tonal ranges is not gradual and therefore outside the limits of a graduated-neutral-density filter. The two pictures below are a great example of why you might decide to shoot using the High Dynamic Range technique. The structure below is a shelter in a park and it does its job admirably – keeping park- goers cool from summer heat. If you set your exposure, however, to approximate what inside the shelter looks like to your eyes the camera blows out the blue sky in the background as in the picture on the left. If you expose for the blue sky, inside the shelter becomes too dark as in the picture on the right.   In order to capture both the blue sky and the proper brightness of the shelter you have to shoot multiple exposures keeping the camera still so they can be combined more easily in Photoshop. The resulting image is below: 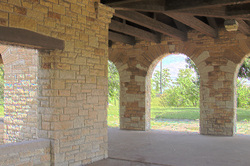 There are three parts to creating the third image you see above. First is shooting, second is using software to combine the images into an HDR image, and third is converting the HDR image to a low dynamic range image that can be viewed on computer monitors and printed in a way that preserves the luminance of the HDR image. Equipment List • Sturdy tripod • Camera that can be shot in manual mode • Camera with manual focus • (Optional) Camera with Exposure Bracketing • (Optional) Scanner to scan images into computer for those shooting with film. Otherwise, the place that develops the film may offer film to digital image conversion as a service Part 1 – Shooting for High Dynamic Range Imaging 1. Attach your camera to your tripod. 2. Set your lens to manually focus and select your plane of focus which should be the distance from your camera to the main subject. If there is a lot of open space in the scene and you’re not sure what you want your plane of focus (the part that is sharpest) to be, try 3 meters for interiors, infinity for outdoors. For a mixed setting similar to the shelter above you will have to play with the zoom until it feels and looks right to you. 3. Decide on your depth of field and select the appropriate aperture. 4. Keeping the aperture and ISO the same throughout this process meter the darkest and lightest areas of the scene and make a note of the recommended exposures indicated by your camera’s light meter. 5. Based on the stop difference between the darkest part and lightest part of the scene decide how many in-between exposures you will need to shoot. The stop difference (or Ev difference) between each shot should not be more than +/- 1 Ev. 6. Shoot. It doesn’t matter if you shoot from the slowest shutter speed to the fastest or vice versa. If you have exposure bracketing as a function in your camera take advantage of that feature. Be sure to program the exposure bracketing feature before shooting so that the two shots the camera takes after yours are at most +1 or -1 Ev from the original exposure you select. Also, since exposure bracketing only results in 3 images (1 of yours plus 2 the camera takes), remember that you will have to shoot at least one more set of exposures in order to have six images for the software to work with. You can use less than 6 exposures. For instance you could shoot one for the shadow area, one for the midtone, and one for the highlight resulting in 3 images; but the more exposures you shoot the better results you will obtain. Part 2 – Merging the images into a HDR Image. 7. After you’ve shot all your exposures download them into a folder on your computer. 8. Open up Photoshop, click on File | Automate | Merge to HDR. 9. Click on Browse and select the images you want Photoshop to merge into an HDR file. 10. If you used a tripod you should not have to select the option near the bottom of the dialogue box that prompts Photoshop to align the images. Selecting that option will add significant time to processing. Click okay. Photoshop uses your images’ metadata (information recorded by the camera about your image such as aperture setting, shutter speed, and ISO) in order to know the order in which to place the images before merging them. For images shot with a film camera metadata may not exist. Photoshop will prompt you to provide the Ev relationship between each image. Assign zero to the image that approximates the shot closest to what your eyes saw then assign a +/- Ev to the other exposures that’s relative to the one you selected as zero. 11. Photoshop will combine your images into a 32-bit HDR image. Before it’s done it will allow you to preview what will be the final image. At this point you can deselect and reselect as many of the exposures that you want and preview the changes. Once you decide which version you prefer click okay. 12. Save the HDR image in tiff format. Your HDR image may look a little dull at this point and that’s because you are looking at a High Dynamic Range image through a low dynamic range computer monitor. Printing it will probably result with the same problem for the same reason. Most printers people use can only capture well low dynamic range images. To get around this issue the image will have to be converted to a low dynamic range image that preserves the luminance and tone of the scene. Part 3 – Conversion of High Dynamic Range Image to Low (aka Standard) Dynamic Range image using Tone Mapping. 13. In Photoshop open your HDR image 14. Select Image | Mode | 8 bit 15. In the ensuing dialogue box select Local Adaptation as a method from the list option. This option is chosen when the goal is to render the image as a faithful reproduction of the scene. 16. Adjust the tonal curve if necessary 17. Click okay The picture of the shelter above used the Local Adaptation method to convert the image. Using this method in Photoshop may result in a pixelated image (as is seen above). Further editing with blur and noise reduction may have to be used to smooth out your images. The Local Adaptation method is preferred in terms of accuracy of tone and luminance. Photoshop has three other methods for conversion: Exposure and Gamma, Highlight Compression, and Equalize Histogram. Below are two images. The left photograph is an image of buildings and structures around the Chicago River shot to stand on its own. The scene was then reshot with the goal of creating an HDR image. The photo to the right is the HDR image converted to a standard or low dynamic range using the Exposure and Gamma method option of conversion in Photoshop. This option allows hyper-realistic images for artistic effect.   I’ve create a video for purchase that details the steps you go through to create a high dynamic range image from a set of exposures. It also shows how to convert an HDR image to a low dynamic range image fit for viewing on a monitor and printing using the Exposure and Gamma method. Screen shots cover the process step by step and include text describing the process. The video is provided on cd and is viewable with a Microsoft Media player. The Price for the video is $8.00. A private lesson on this topic is available as well.
For more info click here
0 Comments
|